
Interior LED lights can be integrated into bedroom wardrobes to enhance visibility and improve the overall organization and aesthetic of the space. This guide details the process of selecting, installing, and maintaining such lighting systems.
Integrating LED lighting Ckensu within a bedroom wardrobe offers several distinct advantages, moving beyond mere illumination to contribute to practical utility and a refined living environment.
Enhanced Visibility and Accessibility
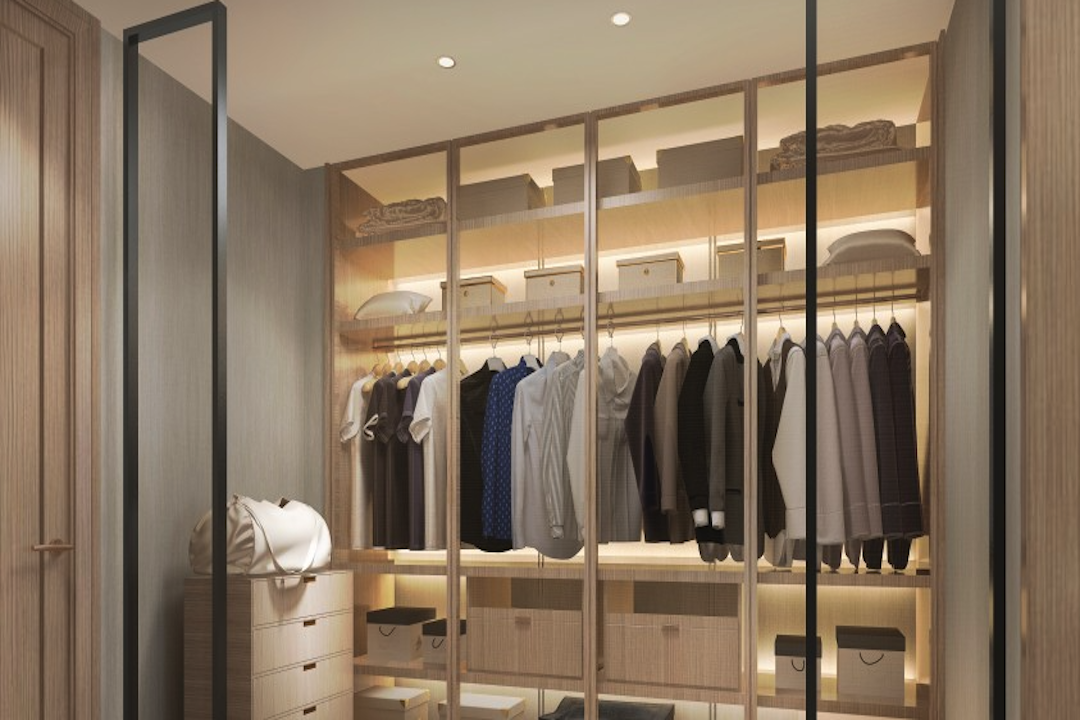
The primary function of interior wardrobe lighting is to provide clear visibility of the contents, much like a well-lit stage allows an audience to appreciate every detail of a performance. Without adequate light, the back of the wardrobe can become a forgotten realm, leading to items being overlooked or difficult to access. LED lights, with their consistent and bright output, cut through the shadows, making it easier to locate specific garments, accessories, or shoes. This direct improvement in accessibility can streamline the daily routine of dressing and undressing.
Improved Organization and Inventory Management
When items are clearly visible, it becomes simpler to maintain an organized wardrobe. You can more easily see what you own, identify gaps in your clothing collection, or recognize items that are no longer suitable for wear. This granular view can instigate more mindful purchasing decisions and contribute to a more curated wardrobe. The ability to quickly scan your entire clothing inventory acts as a form of visual cataloging.
Aesthetic Enhancement and Ambiance
Beyond practicality, interior LED lights provide a subtle yet significant aesthetic upgrade. They can cast a warm glow, highlighting the textures and colors of your clothing, transforming the wardrobe from a utilitarian storage unit into an integrated design element within the bedroom. The light can create atmosphere, adding a touch of luxury or sophistication to the room. This is akin to how carefully placed lighting in a retail environment makes merchandise more appealing.
Energy Efficiency and Longevity
LEDs are recognized for their energy efficiency. Compared to traditional incandescent or halogen bulbs, they consume considerably less power to produce the same amount of light. this translates into lower electricity bills. Furthermore, LEDs have a significantly longer lifespan than many other lighting technologies, meaning less frequent bulb replacements and fewer maintenance concerns. This long-term cost-effectiveness and reduced environmental impact are key considerations.
Reduced Heat Output
One of the notable practical advantages of LED lighting is its minimal heat emission. Unlike older bulb types that can generate substantial heat, LEDs operate at lower temperatures. This is particularly important in enclosed spaces like wardrobes, where an accumulation of heat could potentially affect the longevity of delicate fabrics or cause discomfort when reaching for items. The cool operation ensures the safety and preservation of your clothing.
Types of LED Lighting for Wardrobes
The market offers a variety of LED lighting solutions suitable for wardrobe installation, each with its own characteristics and installation requirements. Choosing the right type depends on factors such as budget, desired aesthetic, and the specific configuration of your wardrobe.
LED Strip Lights
LED strip lights are flexible circuits embedded with multiple LEDs. They are often available with adhesive backing, making installation straightforward.
Features and Applications of LED Strips
- Flexibility and Customization: The pliable nature of LED strips allows them to conform to the contours of shelves, hang rods, or the inner edges of wardrobe doors. This adaptability enables a wide range of placement options, from subtle accent lighting to more comprehensive illumination across entire shelf spans. You can cut them to specific lengths, offering a tailored solution for each wardrobe.
- Versatile Placement: They can be mounted discreetly along the top edges of shelves to cast light downwards, along hang rods to illuminate hanging garments, or around the interior perimeter of the wardrobe for a more ambient glow. Some users opt for vertical placement along the sides of the wardrobe for a dramatic effect.
- Power Options: LED strips are typically powered by low-voltage adapters or run on batteries. Battery-powered options offer greater installation freedom as they don’t require proximity to a power outlet, though they necessitate periodic battery replacement.
Installation Considerations for LED Strips
- Surface Preparation: Ensure the mounting surface is clean, dry, and free of dust or grease. This is crucial for the adhesive backing to create a strong bond. A thorough wipe-down with isopropyl alcohol is often recommended.
- Power Source: Identify the most convenient power source. For plug-in options, consider the proximity to an outlet and how the cable will be managed to maintain a clean appearance. For battery-powered units, decide on how the battery pack will be concealed.
- Cutting and Connecting: Most LED strips can be cut at designated points. If multiple sections are needed, appropriate connectors will be required to link them and maintain electrical continuity.
Puck Lights
Puck lights are compact, circular LED fixtures that are typically surface-mounted.
Design and Functionality of Puck Lights
- Compact and Discreet: Their small size makes them unobtrusive, allowing them to be placed without significantly impacting storage space within the wardrobe. They are often designed to be as minimalist as possible.
- Focused Illumination: Puck lights provide a more directed beam of light, which can be ideal for highlighting specific areas, such as boot shelves or the interior of drawers within the wardrobe.
- Power Sources: Puck lights are commonly available in battery-operated versions, often powered by AA or AAA batteries, or rechargeable lithium-ion batteries. Some may also have options for wired installation where direct power connection is feasible.
Mounting and Power for Puck Lights
- Adhesive or Screw Mounting: Most puck lights come with either strong adhesive pads or small screws for secure attachment. The choice depends on the material of the wardrobe interior and user preference for permanence.
- Battery Management: For battery-powered puck lights, consider the ease of access for battery replacement. Some models feature simple twist-off covers, while others might require detaching the entire unit. Rechargeable options offer a more sustainable solution.
Integrated LED Panels
These are flat, panel-like fixtures that can be recessed or surface-mounted, offering more uniform and expansive illumination.
Advantages of Integrated LED Panels
- Uniform Light Distribution: Integrated panels provide a wider and more even spread of light compared to strips or pucks, effectively illuminating larger wardrobe sections without dark spots. This can create a more professional and polished look.
- Sleek Aesthetics: Their slim profile and often minimalist design contribute to a modern and integrated appearance within the wardrobe. They blend seamlessly with the interior.
- Durability and Reliability: Many integrated panels are designed for long-term use and are often constructed with robust materials.
Installation of LED Panels
- Recessed vs. Surface Mount: Depending on the wardrobe’s construction, panels can be recessed into the ceiling or shelves for a flush finish or surface-mounted for simpler installation. This choice often depends on existing wardrobe structure and the desired outcome.
- Wiring Requirements: Integrated LED panels typically require a mains power connection. This may necessitate electrical work, especially if there isn’t a easily accessible power source within the wardrobe. Consulting an electrician may be advisable for safety and compliance.
Under-Shelf LED Lights
A specific application of LED strip lights designed to cast light downwards from beneath shelves.
Purpose and Effect of Under-Shelf Lighting
- Illuminating Lower Levels: These lights are strategically placed to illuminate items stored on shelves below, ensuring that the entire vertical space within the wardrobe is well-lit, from the top hanging rod to the bottom shelf.
- Creating Depth and Dimension: The downward glow can add a sense of depth to the wardrobe interior, making it appear more spacious and visually appealing. It provides a layered lighting effect.
- Direct Illumination of Garments: They directly light up garments or folded items on shelves, making them easy to see and select.
Installation Nuances for Under-Shelf Lights
- Concealment of the Strip: The LED strip is typically mounted to the underside of a shelf, with the light directed downwards. Careful positioning is needed to ensure the strip itself is not directly visible when looking at the shelf below.
- Cable Management: The power cable needs to be routed discreetly from the strip to the power source, often along the back or sides of the wardrobe, to maintain a clean and uncluttered look.
Planning Your Wardrobe Lighting Installation
Effective planning is the cornerstone of a successful and aesthetically pleasing wardrobe lighting installation. Without careful consideration, the lighting might be insufficient, overly bright, or intrusive.
Assessing Your Wardrobe Space
Before purchasing any lighting, you need to thoroughly understand the dimensions and layout of your wardrobe.
Measuring and Mapping
- Dimensions: Accurately measure the height, width, and depth of your wardrobe. Note the position and dimensions of shelves, hang rods, drawers, and any internal dividers. This data is crucial for determining the quantity and type of lighting needed.
- Internal Layout: Sketch a simple diagram of your wardrobe’s interior. Mark down the locations of existing features, such as doors (sliding or hinged), hinges, and any electrical outlets or wiring that may be present or accessible.
Identifying Lighting Needs by Zone
Consider how you use different areas of your wardrobe.
- Hanging Area: This typically requires good general illumination to easily see and remove clothes from hangers. A continuous light source along the hang rod is often effective.
- Shelf Areas: Shelves can benefit from targeted lighting, either from above or from under the shelf above. This is particularly useful for folded items or storage boxes.
- Drawer Interiors: If you have wardrobe drawers, a small, discreet light that activates when the drawer is opened can be highly beneficial.
- Shoe Storage: Shoes can be difficult to see, especially in lower sections. Dedicated lighting for shoe shelves can significantly improve accessibility.
Determining Power Source Options
The availability and proximity of power sources will heavily influence your lighting choices.
Mains Power vs. Battery Power
- Mains Power: This offers a reliable and continuous power supply, eliminating the need for battery changes. However, it may require electrical wiring or extensions, which could involve professional installation for safety and compliance. This is often the preferred option for integrated LED panels or permanent LED strips.
- Battery Power: Battery-operated lights offer greater flexibility in placement, as they do not rely on being near an electrical outlet. This is ideal for those who prefer a DIY approach or have wardrobes in locations without easy power access. However, it necessitates periodic battery replacement or recharging, which can be an ongoing consideration.
Transformer and Battery Pack Placement
- Concealment: Regardless of the power source, try to conceal transformers and battery packs to maintain a clean and professional look. This might involve placing them on the top of the wardrobe, behind internal panels, or in a readily accessible but hidden compartment.
- Accessibility: Ensure that any compartment housing batteries or transformers is accessible for maintenance without requiring the complete disassembly of the wardrobe.
Choosing the Right Lighting Color Temperature
The color temperature of the light (measured in Kelvin) significantly impacts the perceived look of your clothes and the ambiance of the wardrobe.
Warm White vs. Cool White
- Warm White (2700K-3000K): This produces a soft, inviting glow reminiscent of incandescent bulbs. It is suitable for creating a cozy atmosphere and can make clothing appear richer and more inviting, especially natural fibers.
- Cool White (4000K-5000K): This light is brighter and more neutral, similar to natural daylight. It provides excellent clarity and true color rendering, making it easier to match clothing items accurately. This is often preferred for functional visibility.
- Daylight (5000K-6500K): This is the bluest of the white light options and most closely mimics midday sun. It offers the highest level of detail and color accuracy but can feel less cozy.
CRI (Color Rendering Index)
The CRI measures how accurately a light source reveals the true colors of objects. A higher CRI (closer to 100) means colors will appear more lifelike. For wardrobe lighting, a CRI of 80 or higher is generally recommended for accurate color assessment of your clothing.
Considering Light Brightness (Lumens)
Lumens measure the total amount of visible light emitted by a source. The appropriate brightness depends on the size of the wardrobe and the desired effect.
- General Illumination: For most wardrobes, a moderate level of brightness is sufficient. Overly bright lights can be glaring and wasteful.
- Specific Task Lighting: For areas like makeup vanities or jewelry compartments within a wardrobe, slightly brighter, more focused light might be beneficial.
- Dimmer Switches: For enhanced control, consider LED lighting systems that are compatible with dimmer switches. This allows you to adjust the brightness to suit the time of day or your mood, offering versatility.
Installation Methods and Techniques
Installing LED lights in a wardrobe can range from a simple DIY project to requiring minor electrical work. The chosen method will depend on the type of lighting and your comfort level with tools and wiring.
DIY Installation of LED Strip Lights
LED strip lights with adhesive backing are often the most accessible option for a DIY installation.
Preparing the Surface
- Cleaning: Thoroughly clean the area where the LED strip will be applied. Use a degreaser or rubbing alcohol to remove any dust, dirt, or oils. A clean surface ensures the adhesive bonds effectively.
- Dry Fit: Before removing the adhesive backing, position the LED strip to visualize its placement and determine the exact cutting points if necessary.
Mounting and Connecting
- Peel and Stick: Carefully peel off the backing from the adhesive tape, starting at one end and pressing the strip firmly into place as you go. Avoid touching the adhesive surface with your fingers.
- Connecting Sections (if applicable): If using multiple lengths of LED strip, connect them using the appropriate jumper cables or connectors. Ensure these connections are secure.
- Routing Cables: Guide the power cable from the LED strip to the transformer or power adapter. Conceal the cable by tucking it along edges, using cable clips, or running it behind panels where possible.
Powering the System
- Battery Packs: If using battery-operated strips, secure the battery pack in a discreet location, ensuring easy access for battery changes.
- Plug-In Adapters: Route the cable from the LED strip to the adapter and plug it into a nearby outlet. Use cable ties or clips to manage any excess cable.
Installing Puck Lights
Puck lights are generally straightforward to install, especially battery-operated models.
Placement and Attachment
- Marking Positions: Use a pencil to lightly mark the desired locations for each puck light. Ensure they are positioned to provide optimal illumination to the intended areas.
- Adhesive Mounting: For puck lights with adhesive pads, simply peel off the backing and press the light firmly into the marked position.
- Screw Mounting: If using screws, pre-drill small pilot holes to prevent wood splitting. Then, screw the mounting bracket or the puck light directly into the wood.
Battery Management
- Access: Ensure the puck lights are placed where batteries can be easily replaced. Some lights have a twist-and-lock mechanism, while others may require unscrewing a cover.
Installing Integrated LED Panels
These may require more advanced installation techniques, potentially involving electrical work.
Recessed Installation
- Cutting Openings: This involves carefully cutting precise openings in the wardrobe ceiling or shelves to accommodate the LED panel. Accuracy is crucial for a flush and professional finish.
- Wiring: The panel will need to be wired into the mains power supply. This typically involves connecting live, neutral, and earth wires. This step often requires the expertise of a qualified electrician to ensure safety and compliance with electrical codes.
Surface Mounting
- Bracket Installation: Many surface-mounted panels come with mounting brackets that need to be secured to the wardrobe interior.
- Wiring: Similar to recessed installation, the panel will be wired into the mains power. Again, professional electrical assistance is strongly recommended for this stage.
Incorporating Motion Sensors
For added convenience and energy savings, consider integrating motion sensors.
Functionality of Motion Sensors
- Automatic Illumination: Motion sensors detect movement and automatically turn on the wardrobe lights. They can be set to turn off after a predetermined period of inactivity, conserving energy.
- Convenience: This eliminates the need to search for light switches in the dark.
Installation of Sensors
- Integration with Lighting System: Motion sensors can be wired in series with the LED lights. When motion is detected, the sensor completes the circuit, allowing power to flow to the lights.
- Placement: The sensor should be positioned to have a clear line of sight to the area where movement is expected, typically near the entrance of the wardrobe.
Maintenance and Troubleshooting
Regular maintenance and understanding common troubleshooting steps will ensure your wardrobe LED lighting system functions optimally for years to come.
Cleaning LED Fixtures and Strips
Keeping the lights clean will ensure maximum light output and prevent dust accumulation.
Routine Cleaning
- Power Off: Always turn off the power supply to the LED lights before cleaning.
- Gentle Wiping: Use a soft, dry microfiber cloth to gently wipe down the LED strips and fixtures. For stubborn dirt, slightly dampen the cloth with water. Avoid using harsh chemicals or abrasive cleaners, as these can damage the LEDs or their protective coatings.
- Avoid Moisture: Be cautious not to let excessive moisture get into the LED components or the surrounding electrical connections.
Battery Replacement and Recharging
For battery-powered systems, manage the batteries effectively.
Frequency of Replacement
- Monitoring Indicator: Many battery-operated lights have an indicator that signals when batteries are low. Otherwise, observe a dimming of the light output as an indication.
- Battery Type: Use the recommended battery type (e.g., alkaline, rechargeable) as specified by the manufacturer to ensure optimal performance and longevity.
Recharging Considerations
- Charging Cycles: For rechargeable batteries, follow the manufacturer’s guidelines for charging cycles to maintain battery health.
- Proper Storage: If removing batteries for extended periods, store them in a cool, dry place.
Addressing Common Lighting Issues
Even with quality components, occasional issues can arise.
Flickering Lights
- Loose Connections: Check all electrical connections to ensure they are secure. This includes connections at the LED strip, power adapter, and any extension cables.
- Failing Power Supply: The power adapter or transformer might be failing. If possible, test with a different compatible adapter to see if the flickering resolves.
- Aging LEDs: While LEDs have long lifespans, individual LEDs can eventually fail, causing flickering. This might indicate the need for replacement of the affected strip or fixture.
Lights Not Turning On
- Power Source Check: Verify that the power source is active. For plug-in lights, ensure the outlet is working and the adapter is properly connected. For battery-powered lights, check the battery level or try replacing the batteries.
- Tripped Circuit Breaker: If the lights are connected to mains power, check your home’s electrical panel to ensure the circuit breaker hasn’t tripped.
- Faulty Component: If all other checks are negative, there might be a fault with the LED strip, fixture, or power supply itself.
Dim or Weak Illumination
- Dust Accumulation: Clean the LED fixtures as described above. Dust can significantly reduce light output.
- Low Battery Power: For battery-operated lights, this is a clear indication that the batteries need replacing or recharging.
- Undersized Power Supply: If you have extended an LED strip significantly beyond its recommended length, the power supply might not be sufficient to illuminate it at full brightness.
Upgrading and Expanding Your System
As needs evolve, you may wish to expand or upgrade your wardrobe lighting.
Adding More Lights
- Compatibility: Ensure any new lights you add are compatible with your existing system, especially regarding power requirements (voltage and amperage).
- Aesthetic Consistency: Consider maintaining a consistent color temperature and style to ensure the expanded system looks cohesive.
Incorporating Smart Features
- Smart Plugs: You can make existing plug-in LED lights “smart” by using smart plugs that can be controlled via an app or voice assistant.
- Smart Switches: For wired systems, consider upgrading to smart light switches that allow for app control, scheduling, and sometimes dimming capabilities.
Safety and Electrical Considerations
When working with electrical components, even low-voltage ones, safety should be paramount. Adhering to basic electrical safety principles will prevent accidents and ensure a reliable installation.
Understanding Low Voltage vs. Mains Voltage
LED lighting for wardrobes typically operates on low voltage (usually 12V or 24V), which is generally safer to handle than mains voltage (100-240V).
- Low Voltage Transformers: These devices step down the mains voltage to a safer, usable level for the LEDs. They are a crucial component of most LED systems.
- Mains Voltage Wiring: When integrated LED panels connect directly to mains power, it requires working with higher voltages. This is where professional electrical knowledge is most critical.
Importance of Professional Electrical Installation
For any installation involving direct connection to your home’s mains power, it is strongly advised to engage a qualified electrician.
- Compliance and Safety Standards: Electricians are trained to ensure installations meet all local building codes and safety regulations. Incorrect wiring can lead to fire hazards, electric shock, or damage to your electrical system.
- Proper Circuit Load: An electrician can ensure the new lighting circuit does not overload your existing electrical system.
- Peace of Mind: While DIY can be rewarding, the safety and reliability of your home’s electrical system are not areas for compromise.
Safe Cable Management
Proper cable management is essential for both aesthetics and safety.
- Preventing Damage: Concealing cables prevents them from being accidentally snagged, pulled, or pinched, which could damage the insulation and create a safety hazard.
- Avoiding Tripping Hazards: Ensure cables are neatly routed and secured, so they do not create tripping hazards within the wardrobe or in adjacent areas.
- Heat Dissipation: While LEDs produce minimal heat, ensure cables are not routed in a way that could impede airflow or become excessively warm in confined spaces.
Using Appropriate Connectors and Tools
The right tools and connectors ensure secure and reliable electrical connections.
- Quality Connectors: Use connectors specifically designed for LED lighting systems. These often provide a secure, insulated connection, whether they are for strip lights, wires, or power adapters.
- Proper Crimping/Soldering: If you are making wire connections (which, again, is best left to professionals for mains voltage), ensure they are crimped or soldered properly to create a strong and conductive link.
Avoiding Overloading Circuits
An overloaded electrical circuit can lead to the circuit breaker tripping, or worse, overheating and posing a fire risk.
- Transformer Capacity: Ensure the transformer or power supply you use has sufficient wattage capacity for the total length and power consumption of the LED lights it is powering.
- Consulting Electrician: If you are unsure about the power requirements or potential load on your existing circuits, consult an electrician. They can assess your system and advise on the safest and most efficient approach.